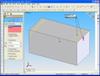
If you have ever tried to add a Chamfer Feature to multiple edges of a part in SolidWorks, this tip might just be for you. Unlike Fillets which seem to be more commonly used, Chamfers can turn out quite different depending on the direction set in the Chamfer parameters. Edges, Vertices, and Faces can be selected when applying Chamfers to models. For this example, I will use edges. You will only see these differences if you are using the Angle/Distance option with an angle other than 45 degrees or a Distance/Distance option with non equal values.
 When applying a Chamfer to a single edge, it is pretty straight forward that you can change the direction that the Chamfer is applied by selecting the “Flip Direction” option in the PropertyManager. Sometimes things can get a little confusing though when you select multiple edges and the Chamfers do not “line up” or look the same. The problem is that the additional edges you have selected have the direction applied in the opposite direction as compared with the first edge. But wait, there’s only one Flip Direction option??
 Well, although it might not be obvious (thus the point of this tip) the flip direction option is dependent on which entity is highlighted in the selection group box. If you try flipping the direction and it is applying it to the wrong edge, click on the edge listing in the group box corresponding to the direction you would like to change, then try again. It may sound simple, but I have run into quite a few users who didn’t realize this.
 Another interesting part of this feature reveals itself if you select edges next to each other (in a chain). If this occurs, SolidWorks automatically aligns the directions for you, thus you don’t have to worry about setting the direction the same for all edges.
A special thanks to Richard Hall for reminding me of this helpful tip.