There are a few things that I discovered recently about the Area/Hatch command in Drawings that I thought I would share.
There are a couple of different ways to apply hatches. How you select the area can effect the options you will have in applying the hatch. There are two options in applying hatches, the Region and Boundary options.
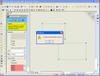
You can pre-select a closed chain of sketch entities and select the Area/Hatch tool to apply a hatch to that area. This basically forces the Boundary option (although the PropertyManager doesn’t reflect it). While this works, it only allows you to apply a hatch to THAT area during the command. If you have other areas that you would like to apply the same pattern to, you have to complete the command and re-enter it again. I got in the habit of applying hatches this way several releases  back. If you select the Area/Hatch command without pre-selecting anything, you get similar results by selecting the Boundary option in the PropertyManager. This opens up a group box for you to select the sketch entities that make up the outer edges of the boundary. Of course, if you select entities making up more than one closed chain, you get an error message (see figure to the right).
 The BETTER way to apply hatches is to let SolidWorks find the boundaries of the areas you want to hatch by using the Region option. The Region option allows you to make a single click inside a closed chain of entities or an area bounded by model edges for your hatch. You can even use a combination of sketch entities and model edges as a region. This option requires LESS mouse clicks and you can apply hatches to MULTIPLE regions in one command! When using this option, you select the Area/Hatch command prior to selecting any Regions to hatch.