Entries from September 2006 ↓
September 29th, 2006 — SolidWorks News
Here is a really great way to show your product to the World…SolidWorks World that is. Product Design Showcase gives SolidWorks users a chance to share their product designs in a professionally displayed area in the Partner Pavilion at SolidWorks World 2007. To nominate your product design for display, click here.
One of the great things about networking through user groups or at conferences is seeing all the cool stuff that has been designed in SolidWorks. If you are going to SolidWorks World next year, make sure you check it out!
September 29th, 2006 — SolidWorks User Groups
There are 4 brand new CSWPs (Certified SolidWorks Professionals)in Alabama this morning. Four members of the North Alabama SolidWorks User Group (NASWUG) passed their CSWP exam yesterday!
Congratulations go out to:
Richard Hall
Brian McElyea
Randy Thomas
Michael Langley
With these guys getting their certification, we now have 6 CSWPs in our User Group!
Great job guys!!
September 26th, 2006 — SolidWorks User Groups
I love user group meetings. The part I love the most about the meetings is seeing the looks of discovery that people have when they learn something new about SolidWorks. Throughout my time as a user group leader and attendee at several user group events I have been fortunate enough to see this many times and it NEVER gets old.
Tonight we had our September 2006 NASWUG meeting in Huntsville, AL. Richard Doyle, who is the User Community coordinator for SolidWorks, was in town and gave his “What’s REALLY new in SolidWorks 2007” presentation. Tonight was the first time I had actually met Richard face to face. Over the past 2 years that I have been a user group leader, I have gotten to know Richard pretty well through our phone conversations and e-mails. Richard has played a very big part in the success of our user group. He is one of those guys who truly has a passion for SolidWorks. That passion and excitement was apparent throughout his presentation tonight and sparked countless positive comments from those in attendance. Richard’s presentation was unique in that it highlighted many small additions to SolidWorks 2007 that truly save time and make the overall experience for the user more enjoyable. Oh, and that look of discovery I referred to earlier…well let’s just say that I think everyone in attendance tonight left knowing something new about SolidWorks (including me) after seeing his presentation. Richard will be making his presentation available and I will be posting it in the coming weeks at our NASWUG website if you are interested.
For those of you who have been fortunate enough to have interaction with Richard whether you are a user group officer, user attending an event, newsgroup reader, or blogger, you pretty much already know what I am talking about. For those of you that haven’t, make sure you check the user group calendar and watch to see when he will be in your area. I promise you won’t be disappointed.
September 20th, 2006 — SolidWorks Reviews
If you haven’t seen or heard about it yet, SolidWorks Explorer has been given a complete overhaul with the release of SolidWorks 2007. The entire user interface has been redesigned and has been integrated with the PDMWorks Workgroup Standalone Client. Also included is the new SolidWorks Search capability and the Pack and Go option.
The integration of the PDMWorks Workgroup Standalone client is very interesting. PDMWorks Workgroup is treated as an add-in to SolidWorks Explorer. If you have the proper licensing you are prompted during the install of SolidWorks Explorer to add the PDMWorks Workgroup Client. For this review, we will concentrate mostly on the differences in the core SolidWorks Explorer product. PDMWorks 2007 will be covered in a later review.
As you can see in the image to the left, the user interface has changed considerably. The pane on the left has two tabs. One tab is a File Explorer which allows you to view the contents of your computer along with any mapped network drives. The second tab is a Results tab that displays search results of the new SolidWorks Search feature. The pane on the right displays the contents of a folder or properties of a file depending on which is selected in the left pane. Across the top of the UI there are some toolbar buttons that allow you to refresh the display panes, save the content display to TXT or CSV formats, SolidWorks Explorer Options, Client information, & Help.
The SolidWorks Search tool is located at the top of the screen. By default it allows you to search
Local Files on your computer or files in the User Library of 3D ContentCentral. The local search is based on Microsoft’s Desktop Search Engine which can be installed during the SolidWorks 2007 install (optional). For it to work quickly, your local files need to be indexed. This can be done through the SolidWorks Explorer options (Search tab). Also available in the search options window is the ability to designate specific search locations on your computer or mapped drives.
Selecting a SolidWorks document in either pane brings up the SolidWorks Explorer options that we saw in the previous versions. Options for Custom Properties, References, Where Used, Configuration, Hyperlinks, and E-Drawings View are displayed in the top half of the right pane in the form of typical windows tabs. When you select a file in the left pane, a temporary toolbar is shown above and to the right of the selected file. This toolbar remains in view for a few seconds before it disappears. All file selections contain at least one button which is an “Open” option. SolidWorks documents display three additional buttons. Two of the buttons allow you to “Rename” and “Replace” SolidWorks files. The user interface for each has changed, but the functionality is very similar to previous versions. The third additional button is for the new SolidWorks Pack and Go option.
The Pack and Go option will copy the selected document along with all references. There are options to include Drawings and COSMOS Results as part of the referenced documents. At the bottom of the dialog it automatically keeps track of how many Assemblies, Parts, Drawings, and “Other” documents will be included as part of the Pack and Go. You can save all the files to a folder or save them to a zip file. When using the zip option, you can utilize the “E-mail after packaging” checkbox. There are also options to add prefixes or suffixes to all the file names. You can also utilize some replace options as well.
The enhancements to the user interface and functionality is a welcome change. After using it a few times you don’t even think about the old interface at all. I can easily see the Pack and Go option being a user favorite.
Stay tuned…..more to come!
September 6th, 2006 — SolidWorks Tips
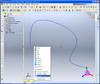
Have you ever been frustrated when trying to manipulate splines in 3DSketches? I think most of us who have used them have felt that way from time to time. Most of that frustration can stem from the view orientation of the model in relation to the direction that you are trying to manipulate the point or control polygon. One way around this is to utilize the multiple view window option available in the lower left hand corner of the graphics area. This allows you to use orthographic views in multiple viewports to manipulate the spline to the desired shape. There is a tool that can be used to manipulate 3DSketches in defined directions in a single viewport. This tool is called the Sketcher Triad.
The Sketcher Triad is available from the right mouse button menu in the graphics area of a 3DSketch. If you right click on a vertex, the triad will appear on the screen at that point. You can also right click in the graphics view (away from any
geometry) and the triad will appear in the lower right corner of the screen. The triad has arrows oriented in the model’s default X, Y, & Z directions. If the triad is snapped to a vertex you can click and drag the arrows to move the point in the arrow’s direction. You can also click on one of the three planes represented on the triad to move the point in that plane.
If you wish to move the triad to another point, there is a right-click menu option available. The right-click menu also allows you to align the X, Y, & Z directions to another entity or back to the component origin. You can turn off the triad through the right-click menu as well.
Another great option available allows you to lock the direction of manipulation. If you double-click the arrows or planes of the triad, all sketch movements will occur in that direction or plane. Even if the triad is snapped to a point, all points manipulated will follow the triad setting. This behavior will continue until you select another direction or hide the triad.
I have found this VERY useful when freeform routing electrical cables in SolidWorks Routing. It also comes in handy in defining 3D guide curves for complex geometry. The beauty of it is that the triad can be used for ANY sketch geometry in a 3DSketch. The next time you get the chance, open a 3DSketch and try it out for yourself!
September 5th, 2006 — SolidWorks News
I recently got to do an interview with some of the marketing folks at SolidWorks for a series of podcasts being released this week. (SolidWorks 2007 launch week)
Check out the SolidWorks Podcast page if you get the chance. A big thanks to SolidWorks for giving me a chance to talk about my job, the blog, and SolidWorks 2007.
For a direct link to the mp3 file, click here.